Setting up Windows Integrated Authentication for the web console
You can use Windows authentication when your IIS server runs on a corporate network that is using Microsoft Active Directory service domain identities or other Windows accounts to identify users.
-
Active Directory Identity Connector should be set up in Venafi Configuration Console.
- The Windows server that Trust Protection Platform is installed on and hosts the Web Console needs to be a member of the Active Directory Forest that you want to support for Windows Integrated Authentication.
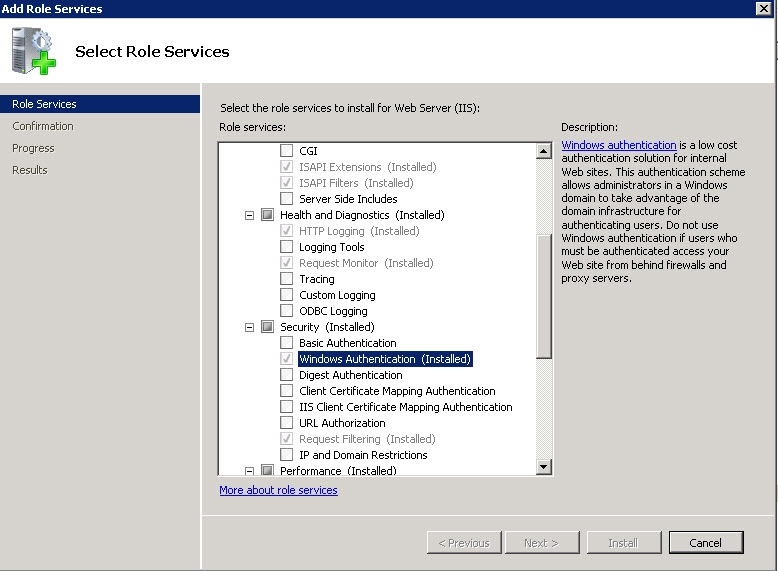
- Windows Authentication must be installed as a role service of the web server role on the Windows machine.
- In Windows, click Start, and then click Administrative Tools, and then click Server Manager.
- In Server Manager, click the Manage menu, and then click Add Roles and Features.
- In the Add Roles and Features wizard, click Next.
- Select the installation type and click Next.
- Select the destination server and click Next.
-
On the Server Roles page, expand Web Server (IIS), expand Web Server, expand Security, and then select Windows Authentication.

- Click Next.
- On the Select features page, click Next.
- On the Confirm installation selections page, click Install.
- On the Results page, click Close.
- Open the Internet Information Services (IIS) Manager.
- In the Connections pane, navigate to the Venafi server.
- Select the console you want to configure (VEDAdmin, VEDAuth, or Aperture)
-
Under Management, click Configuration Editor.
- In the Configuration Editor Window, in the Section drop-down, make sure system.web/authentication is selected.
-
In the Deepest Path group, Forms node, mode entry, use the drop-down to change the mode from None to Windows.

- Click Apply.
- Repeat until this process has been done for both VEDAdmin, VEDAuth, and Aperture.
- Open the Internet Information Services (IIS) Manager.
- In the Connections pane, navigate to the Venafi server.
-
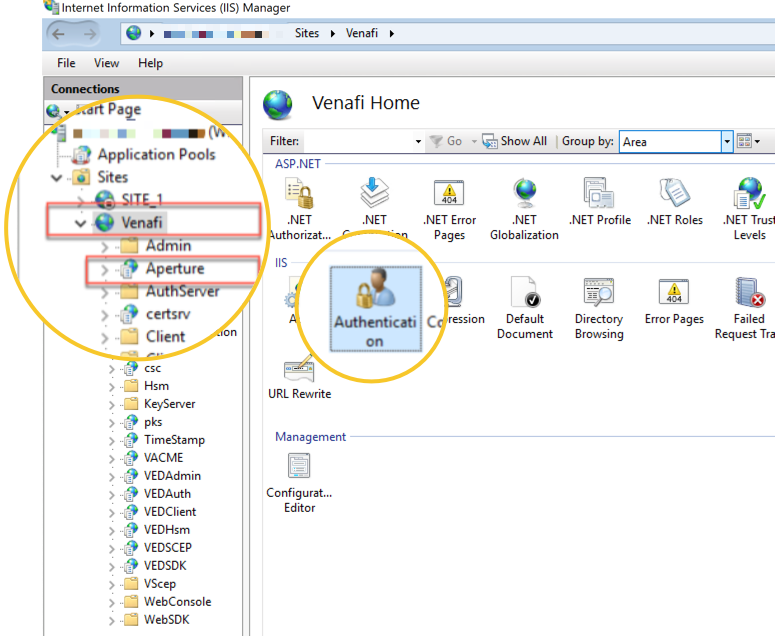
Under IIS, click Authentication.
-
You will need to modify two sites: Venafi, and Aperture. For each of the highlighted sites:
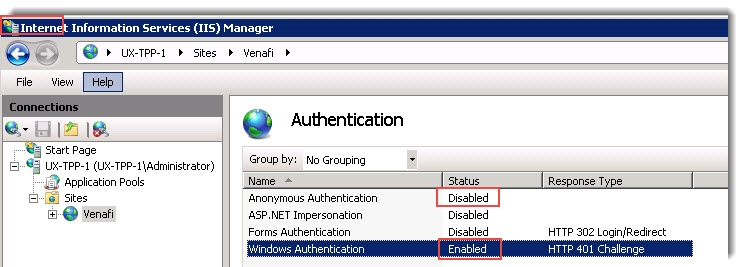
- Right click Anonymous Authentication and choose Disabled.
- Right click Windows Authentication and choose Enabled.

For example:

IMPORTANT Be sure to restart IIS after setup.
NOTE This step is not necessary if you are only configuring Venafi Platform to enable the MMC Snap-In Collection.
First, you need to configure your machine's internet options to allow it to use your username and password for integrated authentication.
-
On the user's local Windows Control Panel, open Internet Options.
-
Click the Security tab, then click Trusted sites, then click the Sites button.
-
Enter the FQDN for your Trust Protection Platform server, then click Add. If you are using a load balancer, enter the FQDN to connect to the cluster, then click Add. For example:
https://venafi-server.example.com -
Click Close.
You'll return to the Security tab.
-
Click Local intranet, then click the Custom Level... button.
-
Scroll to the bottom of the Settings list.
-
Under User Authentication > Logon, click Automatic logon with current user name and password, then click OK.
-
Click OK on the confirmation window.
You'll return to the Security tab.
-
Click Trusted sites, then click the Custom Level... button.
-
Scroll to the bottom of the Settings list.
-
Under User Authentication > Logon, click Automatic logon with current user name and password, then click OK.
-
Click OK on the confirmation window.
You'll return to the Security tab.
-
Click OK to save the configuration changes and close the Properties window.
Now configure your web browser for automatic login.
- For Edge, Google Chrome (and other Chromium browsers), see https://sites.google.com/a/chromium.org/dev/developers/design-documents/http-authentication.
- For Firefox, see https://support.mozilla.org/en-US/kb/Firefox.