Setting up certificate discovery work
To perform certificate discovery work, create and configure the work and then assign it to one or more groups.
For more information about groups, see Working with Client Group Settings.
TIP Changes you make in TLS Protect can take up to 10 minutes before they take effect. This delay is designed to minimize impact on your server's performance. However, if you want to force your changes immediately, either use IIS Manager to recycle the VEDClient Application Pool (for the Trust Protection Platform server) to refresh the configuration cache, or issue the iisreset command to restart the IIS web server.
For SSH agentless groups, you'll need to restart the Trust Protection Platform service (vplatform).
IMPORTANT If you are using Server Agents, you must configure device placement work, too. If you don't, then the agents cannot receive SSH, certificate discovery, or certificate installation work. This is because a device must be created in the designated folder before Trust Protection Platform can send work to Server Agents.
Also, even if you've already configured device placement work, it could take up to two check-ins with Trust Protection Platform before discovery work is received. This is because work that is sent to the agent occurs in random order.
For more information, see Configuring SSH and Certificate device placement work.
To set up certificate discovery work
- From the TLS Protect menu bar, click Clients > Work Settings.
-
If you are adding new certificate discovery work, click Add Work. Give the new work a Name, select Certificate Discovery from the Type drop-down list, and then click Create.
If you are modifying existing work, click the work name.
-
In the Certificate Discovery Enabled section, click Yes to enable SSH discovery work.
NOTE If you want to configure the work but not enable it, leave the No checkbox checked.
-
In the Schedule section, do the following:
-
In the Scan Interval list, select the frequency with which the discovery work should be performed. If you select Days of Week or Days of Month, a field appears that allows you to specify the days.
The On Receipt option allows you to execute the discovery when the Venafi service is started. When this option is selected, the Scan Time and the Randomize Scan Time By options are no longer available.
-
From the Scan Time list, select the hour of the day when you want the scan to run.
NOTE When you select Hourly as the Scan Interval, the Scan Time field is hidden.
-
In the Randomize Scan Time By field, specify (in minutes) the window of time to be used by all agents for checking in with Trust Protection Platform.
Without this option, all agents would likely check in at the same time, beginning at the hour you selected from the Scan Time list. Randomizing check-ins reduces the load on both your network and the Trust Protection Platform server.
-
-
In the One Time Full Scan section, click Schedule Full Scan if you want to re-run a complete scan. (After the full scan is complete, subsequent scans will only send changed data.)
DID YOU KNOW? After an initial scan, subsequent scans only send changes to the Trust Protection Platform server. This reduces the load on the Trust Protection Platform server. Using the One Time Full Scan option allows you to re-run a complete scan.
-
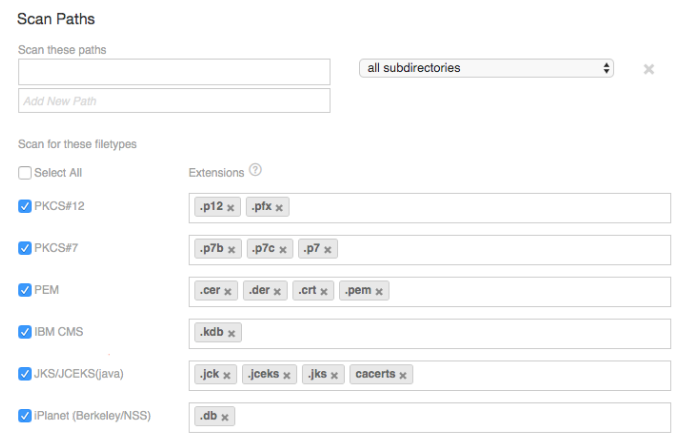
Under Scan Paths, do the following:
-
in the Scan these paths field, type a path that you want scanned. Choose whether you want to scan subdirectories.
This option lets you include specific file paths during a scan cycle.
Click Add New Path to add additional scan paths.
NOTE The /dev and /proc directories on Unix and Linux platforms cannot be scanned. They are intentionally excluded because they are not common (nor recommended) locations for storing keys and certificates.
-
Under Scan for these filetypes, clear any keytypes and extensions that you do not want included in the discovery.
All supported filetypes and their associated extensions are selected by default.
Add any custom file type extensions that you want to associate with each filetype.
EXAMPLE If you use a custom file type extension of .p12 for a PKCS12 keystore file, select PKCS#12 and enter *.p12 in the Extensions field. Press Enter to type additional file type extensions.
 Default Keystore Filetype Extensions
Keystore
Default Filetype Extensions
PKCS#12
.p12
.pfx
PKCS#7
.p7b
.p7PEM
.pem
.crt
.cer
.der
.pem
IBM GSK
.kdb
JKS/.JCEKS (java)
.jks
.jceks
.jck
iPlanet (Berkeley/NSS)
.db
-
-
(Optional) Under CAPI, do one of the following:
-
Select Scan Default if you want the agent to scan the Windows CAPI (Windows Store) truststore.
This options finds all root CA, intermediate CA, and end entity certificates installed in the system account of the scanned computers.
-
Select Scan specific list to configure the agent to specifically scan any combination of Personal, Trusted Root Certification Authorities, Third-Party Root Certification Authorities, and/or Intermediate Certification Authorities stores.
The Scan specific list option is the default setting and the Personal value is set for you.
- Select None if you do not want to scan the Windows CAPI truststore.
-
- Under Credentials, in the Keystore Credentials field, begin typing the name of the credential object you have defined in Trust Protection Platform, and then select a credential from the resulting list.
-
Under Placement Rules, do the following:
- (Conditional) In the Execute rules in this order field, select an existing rule, or click Create New Rule to define a new one.
-
(Required) If you do not specify a rule in the previous step, select (or create) a folder where you want Trust Protection Platform to place discovered certificates.
For information about network discovery placement rules, see Creating placement rules.
- (Optional) Click Show advanced options to reveal Scan Exclusions and Resource Use settings.
-
(Optional)(Conditional) In the Scan Exclusions section, there are multiple options you have to exclude file systems, file patterns, or paths.
-
If you want to scan remote mount volumes that are mounted using NFS or CIFS on Linux or Windows servers, or NTFS junction points on Windows servers, select Scan file systems mounted via NFS/CIFS/NTFS junction points.
DID YOU KNOW? This option is disabled by default to avoid scanning potentially large remote volumes that you might not want included during agent scanning.
-
In the Ignore specific file patterns field, type specific file names, or use wildcard characters to include partial names or extensions.
For example, you could type thumbs.db to exclude common Microsoft thumbnail files during agent scanning.
-
In the Exclude these paths field, type a path and then select either all sub-directories or no sub-directories.
NOTE If a path is specified in both the Scan Paths section and in the Scan Exclusions section, the path will be excluded.
For example, if you enter C:\users\admin\ in the Scan Paths section, and enter C:\users in the Scan Exclusions section, C:\users\admin\ will be excluded.
-
- When you are finished, click Save.